
*Note: Some excerpts are from here: http://www.wikihow.com/Draw-Manga
Some of this I use, some not: your mileage may vary.
Overall the article was...a start, but there are better ones available:
http://www.scribd.com/doc/2080605/Figure-Drawing-Basics is a very good one.
When I started out, The book How To Draw Comics The Marvel Way was a bible. Since then I've drifted away from that thinking. It's not a bible, but it does have a lot of good information to pass on.
Draw the Frame. This is the basic framework of your character. Draw the general lines for where arms/legs will go, as well as their positioning. Draw the circle for the head first, a line for the spine, a line for the shoulders (a little below the head so there's a neck.), a line across for the hips, and lines for the arms/legs. It may be easier to draw circles for joints (shoulders, knees, elbows), so you can proportion the lower leg to upper leg, and lower arm to upper arm. Essentially, a stick figure. This step is to block out the proportions and figure out what your character is doing; Standing? Sitting? A heroic pose?

- Things to note!
- Top of head to hips should be a little less than 1/2 the total height, hips to tips of toes being the rest.
- The humerous (upper arm) extends from the shoulder point to the bottom of the floating ribs. The forearm should be approx the same length
- Measurement from elbow to fingertips should be approx the same as hip to knee.
- The tips of your character's fingers should come to about the middle of their thighs when held loosely at the sides.
- Something seem strange about your stick figure? Don't ignore it; fix it. Do lots of stick figures and choose the one that best fits the illustration...don't just do one and call it good (unless of course you're just that good).
- Draw the figure without clothing first. Once the shape of the figure is defined, you can add clothing on top.
- Demihumans will have different proportions...sort this out now, at this stage.

*Note: This is a dwarf, demihuman character, not human, so proportions are set for THAT.
- Head: Indicate which way it's facing with a line, and then add the chin and cheekbones.
- Chest/Torso: Block it in with a circles, ovals, blocks, whatever works for you.
- Hips: Can be indicated with a sphere/circle
- Limbs: Can be blocked in with ovals or cylinders, with circles/spheres for the joints.
- Hands and Feet: Can be left simple for now, though you might want to indicate their positions.
Try this search for more ideas:
http://images.google.com/images?ie=UTF-8&oe=UTF-8&sourceid=navclient&gfns=1&q=anatomy+drawing&um=1&sa=X&oi=image_result_group&resnum=4&ct=title
Don't hesitate to print out and keep photo/ images as references handy.
Refine your figure. Still don't worry about details for now, but clean up your lines, make sure the outlines are heavier, and generally just make the figure clearer. A good eraser can come in handy here.

*Note: in this instance I went over this with a sharpie so I could transfer the image fresh to a new page. This was a choice, not a necessity.
Start adding detail. Start drawing in the clothes, making sure they fit the form of your character. Draw the hands and feet, and fill in the facial details - eyes, nose, mouth, hair, etc.
*Note: This was transferred by lightboard to a fresh page and details added on top of it. I do this sometimes just so I have a nice clean page/ image to work with. Again, a choice, not dogma.
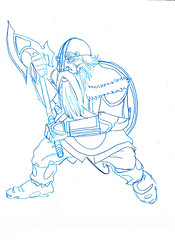
Clean up and ready for inking. Erase any stray lines, and make sure you know which ones you want to keep. This is where the transferred image comes in really handy. Keep a good eraser close by.
*Note: until this point I have been working with a non-photo blue pencil.

*Note: now I have changed over to a HB Mechanical pencil: every stroke, every line is prepped for inking. When I ink, it will almost be exactly the same as this image. Essentially...I'm pre-inking. This is something *I* do.
By this point in the project, your hands and eyes have an intimate knowledge of the image. Your hands have gone over the same lines several times and the muscle memories are full-swing. This is important for when you start inking: a very detail-oriented precision process and steady hands are an absolute must. By doing what I've done here, I've trained my hands to be able to hit every mark, stick to every line without missing or getting sloppy.
Next: INKING!
No comments:
Post a Comment